Usage
This framework is developed without affecting any function components of RecyclerView. This framework will also be maintained continuously.
Starring/sharing can get more people involved in this open-source project. Click the small pencil icon in the top right corner of the document to directly revise the document ↗
Creating a Simple List
rv.linear().setup {
    addType<SimpleModel>(R.layout.item_simple)
}.models = getData()
The keyword "BRV" in the code represents this framework, and "RV" represents RecyclerView. The "setup" function is just a simplification for creating a BindingAdapter object.
4 Ways to Populate Data in the List
BRV supports 4 ways to populate data. Here, the term "Model" is equivalent to data class/JavaBean/POJO.
1. Function Callback
Populate data in the "onBind" function callback.
rv.linear().setup {
    addType<SimpleModel>(R.layout.item_simple)
    onBind {
        findView<TextView>(R.id.tv_simple).text = getModel<SimpleModel>().name
    }
}.models = getData()
2. Implement Interface
Implement the "ItemBind" interface in the Model class and implement the "onBind" function to populate data. This approach is commonly used in many frameworks, such as BRVAH. However, I do not recommend binding views in the Model class, as the Model should only store data and calculation logic and should not contain any UI-related code.
class SimpleModel(var name: String = "BRV") : ItemBind {

    override fun onBind(holder: BindingAdapter.BindingViewHolder) {
        val appName = holder.context.getString(R.string.app_name)
        holder.findView<TextView>(R.id.tv_simple).text = appName + itemPosition
    }
}
3. ViewBinding
rv.linear().setup {
    addType<SimpleModel>(R.layout.item_simple)

    onCreate {
        getBinding<ItemSimpleBinding>().tvName.text = "Text Content"
    }

    onBind {
        val binding = getBinding<ItemSimpleBinding>() // Use ViewBinding/DataBinding here
    }
}.models = getData()
4. DataBinding
Automatically populate data using DataBinding, which is recommended as it requires the least amount of code and provides flexibility.
a. Enable DataBinding
The first step is to enable the DataBinding framework in the module's build.gradle file.
apply plugin: "kotlin-kapt" // Apply the kapt plugin for dataBinding

android {
    /.../
    buildFeatures.dataBinding = true
}
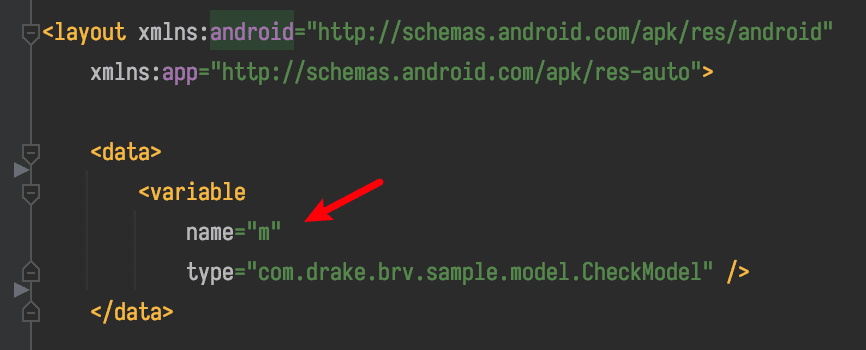
b. Declare Variables in Layout
The second step is to declare variables in the layout file and bind them to the view elements.
<layout xmlns:android="http://schemas.android.com/apk/res/android">

    <data>
        <variable
            name="m"
            type="com.drake.brv.sample.model.SimpleModel" />
    </data>

    <LinearLayout
        android:layout_width="match_parent"
        android:layout_height="wrap_content">

        <FrameLayout
            android:id="@+id/item"
            android:layout_width="match_parent"
            android:layout_height="100dp"
            android:layout_margin="16dp"
            android:background="@drawable/bg_card"
            android:foreground="?selectableItemBackgroundBorderless">

            <TextView
                android:id="@+id/tv_simple"
                android:text="@{String.valueOf(m.name)}"
                android:gravity="center"
                android:layout_width="match_parent"
                android:layout_height="match_parent" />

        </FrameLayout>

    </LinearLayout>
</layout>
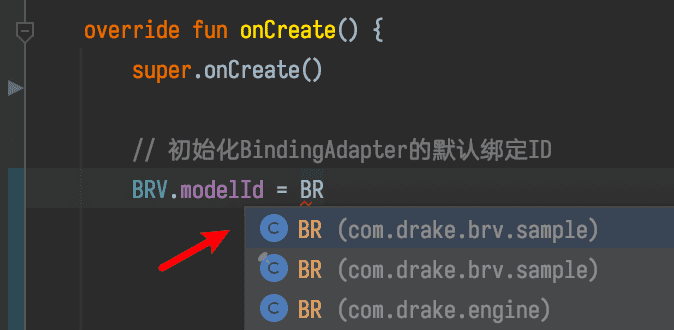
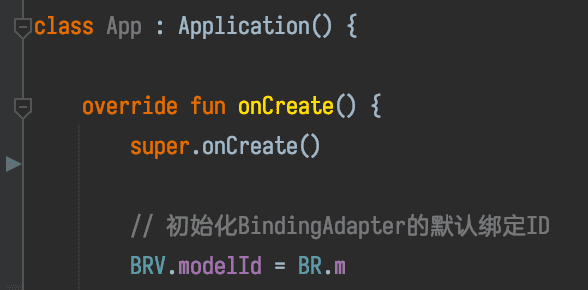
c. Initialize Global ID
class App : Application() {

    override fun onCreate() {
        super.onCreate()

        // Initialize the default binding ID for BindingAdapter; not required if not using DataBinding
        BRV.modelId = BR.m
    }
}
rvis a list. Themodelsproperty is a list collection where each element corresponds to an item. DataBinding will automatically bind the elements in themodelslist to the XML based on the assigned ID.
- Note that you need to declare the variable
name="m"in some layout or item layout to generateBR.m. Once you declareBRV.model = BR.m, all item layouts used by BRV must usename="m"to declare the data model; otherwise, automatic binding by BRV will not work.
- Pay attention to the import of BR from your module. This ensures that all layouts using that ID to declare the data model will be automatically bound by BRV.
-
If the generated class still does not exist, perform a "Make Project" operation (green hammer icon in the toolbar).

-
The variable
m(short for model) can be named anything else, such asmodelorsb. If you usename="data", then you should useBR.data. BothBR.dataandR.id.dataare ID constants and are essentially Int values. You can click to view the BR.m source code.
d. Building the List
This approach does not require handling data explicitly.
rv.linear().setup {
    addType<SimpleModel>(R.layout.item_simple)
}.models = getData()
Despite the complexity mentioned in the documentation, the DataBinding approach requires the least amount of code and provides the highest decoupling.
When using DataBinding, you can copy or reference my commonly used custom attributes: DataBindingComponent.kt
If you want to learn more about DataBinding, please read A Complete Guide to DataBinding.